Face Shaping
Face shaping is more of an art than a science, and it has the biggest impact on the face you create. I recommend looking at a picture of the person you are creating while completing face shaping steps.
Stuff head and thread a needle with yarn and create a large, secure knot at the end.
Determine eye socket placement: about a third of the way down the head, slightly closer or further apart based on the face.
Start by creating indents for the nose bridge at the corners of the eyesockets. Close together for more narrow noses, further apart for wider or less defined noses or wideset eyes. Sew up through the hole where you have been crocheting so knot stays secure in head stuffing, then out through the first eye socket
Sew back through the head into the second eye socket Pull tightly enough so that the shape of the face begins to change creating a more subtle bridge of nose, then sew through to center of eyesocket and complete instructions again between center of eye sockets, pulling more tightly between these stitches vs. the original ones on the bridge of nose
Sew back and forth between the eye sockets a few more times to secure
Push needle / thread through side or back of head to remain accessible but out of the way.
Place and secure safety eyes before continuing in the pattern
Optional eye white and lash detail: Add whites of eyes and lashes using white thread sew two stitches around, slightly under the corners of each safety eye, then use scrubby yarn to sew one or two passes of lashes above eye.
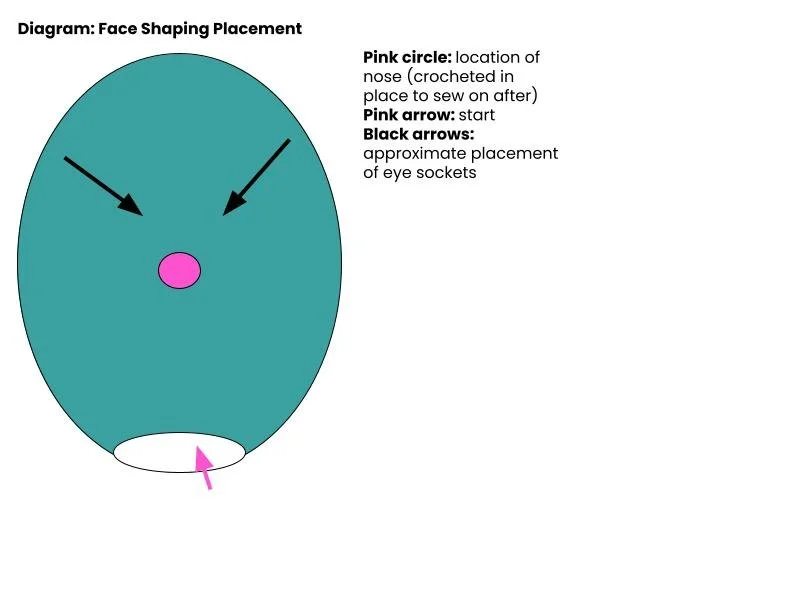
Diagram: Limb Corner Placement: Pink circles: location of “limb corners” Black arrows: direction of closing round seam