Design Your Own
Person Doll
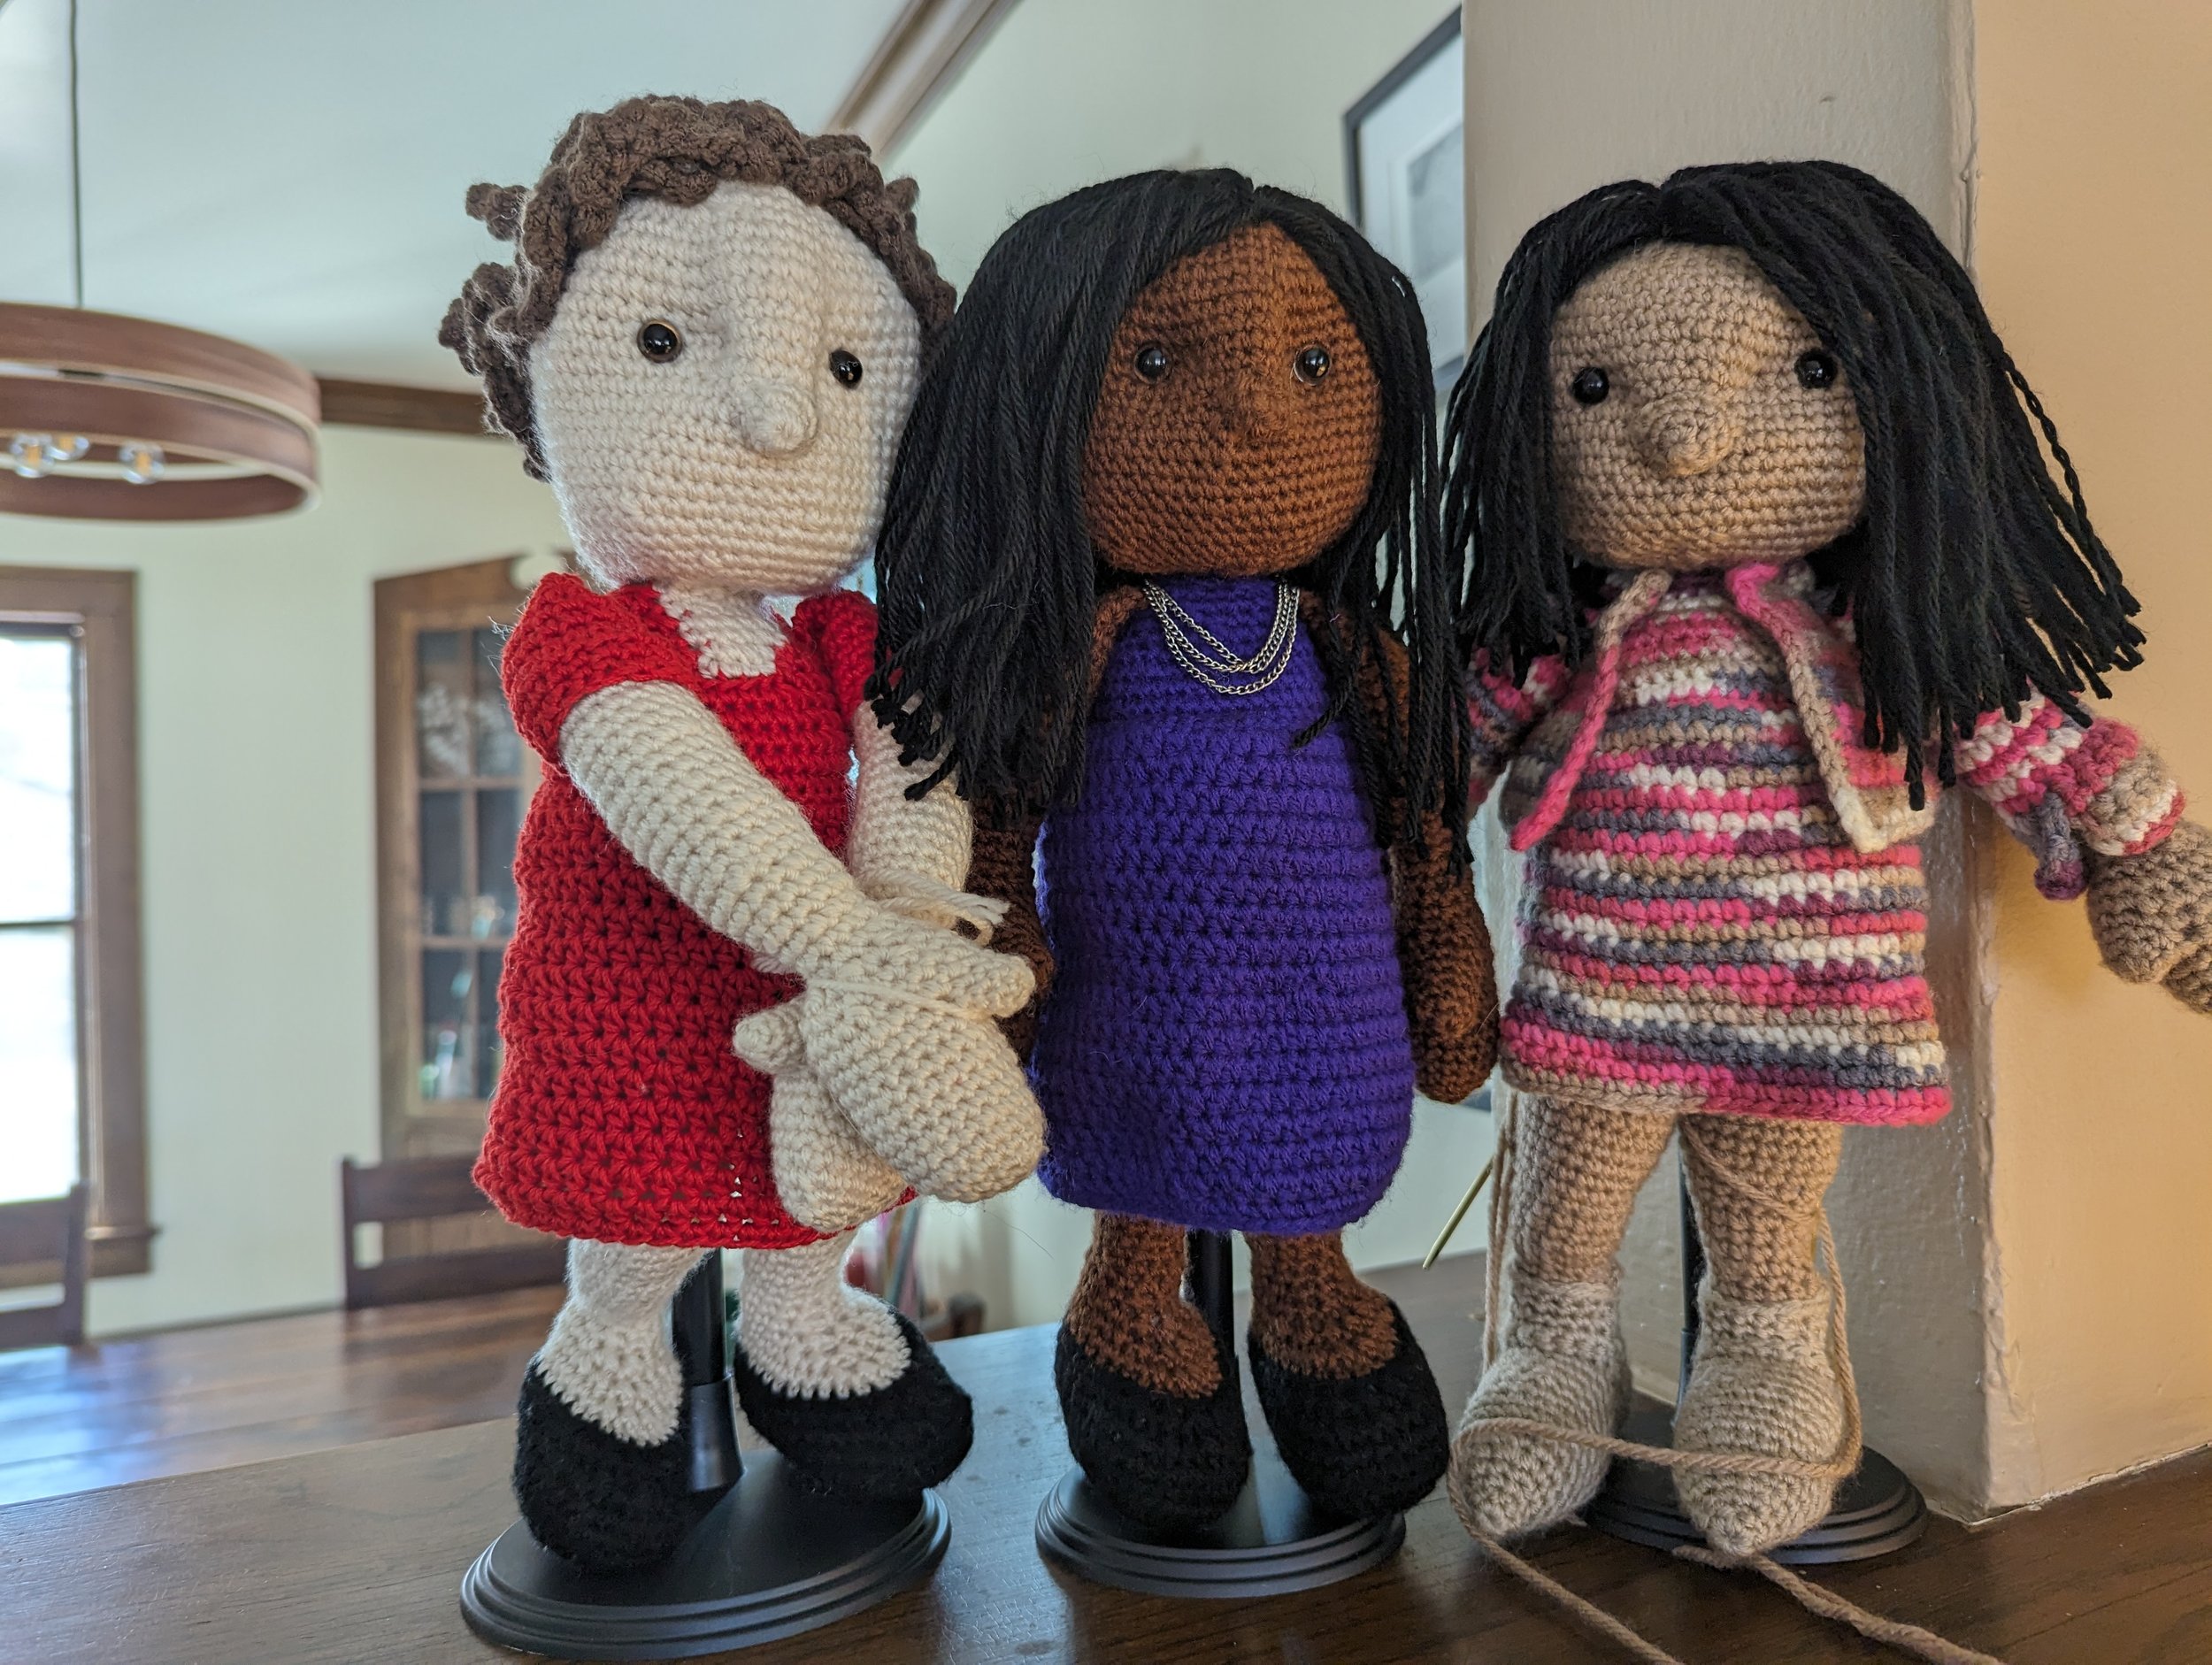
This pattern was created as a base so you can make a doll to honor anyone you admire. With a bit of adaptation, you could make a doll to look like your favorite cartoon character, pop singer, or city council member (all examples I have tried).
Height: 17" standing | Skill level: Intermediate-Advanced | Terms: US
Supplies Needed
crochet hook (I use a 3.0mm, select a hook 2 or 3 sizes smaller than yarn recommended )
Stitch markers
Yarn needle
Scissors
Fiber fill
Yarn (acrylic, worsted weight)


Hands and Arms (make 2)
Determine if your doll will have bare arms, or sleeves (either short or long sleeves). If creating a doll with bare arms skip all sleeve instructions. Instructions create sleeves as shown in reference photos, Additional sleeve and jacket types are available in the Alternative Instructions section.
Thumb
create 6 sc into a magic circle (6)
*inc, sc* three times (9)
*sc* around (9) Repeat for 2 total rounds
Tie off. Set aside to use while making hand.
Hand, Wrist, and Arm
create 6 sc into a magic circle (6)
*inc* around (12)
*sc, inc* around (18)
*sc* around (18) Repeat for 5 total rounds
Join thumb to hand: insert hook through inside of thumb to outside, then through the next stitch of palm as usual
sctog join(thumb to hand/ palm) 4, continue around palm, sc 14 (18)
sc, turn to begin to work around outside of thumb, sc 5, return to palm, sc 14 (20)
*sc* around (20)
*sc 4, dec, sc 4* around (18)
hide all ends inside hand and thumb, stuff.
*sc, dec* around (12)
*sc* around (12) Repeat for 4 total rounds
long sleeves only: *sc, inc* around (18), tie off, begin sleeve instructions.
*sc 3, inc* three times (15)
*sc* around (15) Repeat for 3 total rounds
*sc 2, inc, sc 2* around (18)
*sc* around (18) 10 total rounds
short sleeves only: tie off, stuff arm, and set aside, skip to sleeve instructions to finish arm. bare arms, continue below
*sc* around (18) Repeat for 2 total rounds
*sc 7, dec* two times (16)
*sc 3, dec, sc 3* around (14)
ensure arm and hand are lightly stuffed.
*dec, sc 5, * two times (12)
complete a few less or a few more sc so when folded flat, you have ended on the corner,
ch 1, sctog closed 6 (6)
tie off, set aside until creation of body.
Sleeve
created by working in rounds following a foundation chain
Foundation chain: ch 18, slst to first chain, ch 1
*sc* around (18)
*sc* around (18) Repeat for 2 total rounds
Short Sleeves Only: to make a capped sleeve (very short) only complete one round above, for longer short sleeve, add 2 -4 more rounds before continuing
All: Join Sleeve to Arm: Carefully pull the arm through the sleeve so the top of arm and sleeve line up and working yarn is accessible..
sctog join (sleeve to arm) 18 (18)
*sc* around (18)
Long Sleeves Only: repeat round 14 more times
*sc 7, dec* two times (16)
sc 3, dec, sc 3* around (14)
*dec, sc 5, * two times (12)ensure arm and hand are lightly stuffed
complete a few less or a few more sc so when folded flat, you have ended on the corner
ch 1, sctog closed 6 (6)
tie off, set aside for use when creating body
Shoe and Leg (make 2)
Determine if your doll will have pants, shorts, or a dress, what type of shoes they will have, if they will have socks, and what colors each item will be. The instructions below include directions for a ballet flat and a lace up shoe. Common shoe types are made using the following instruction options:
Ballet Flats: Follow ballet flat instructions with flat shoe options for the heel
High Heels: Follow ballet flat instructions with high heel options
Loafers / Men’s Dress Shoes: Follow lace up shoe instructions with short heel options
Sneakers / Tennis Shoes: Follow lace up shoe instructions with flat shoe options
If adding socks, switch to the sock color when prompted based on shoe type, continue until socks are desired length, then switch to skin color and complete first round of skin color BLO.
Heel
Determine if your doll will have a heel on their shoe, and complete the heel first from the Alternate Instructions section. The doll might have one of the following heel types:
Flat shoe (ballet flats, tennis shoes, etc): start with instructions below
High Heel
Short Heel (short and wider heel, like men’s dress shoes)
Shoe and Ankle
Instructions create narrow pants which end at the ankle, as shown in the reference photos.. Other pant types are available in the Alternative Instructions section.
Foundation Row: ch 10, starting in the 2nd ch from the hook: sc 9 across, ch 1, turn.
*BLO sc 7, BLO inc, BLO sc 3 all in the last stitch*, continue around the other side of the foundation row, working into the front loops left behind in the previous step. Repeat instructions between * * a second time FLO (24)
*sc 9, inc 3* two times (30)
Alternate Instructions for Heel: If adding heels, use joining heel to shoe steps in alternate instructions section, and continue with round 7 below.
sc 9, *inc, sc* three times, repeat all instructions in round a second time (36)
sc 9, *inc, sc 2* three times, repeat all instructions in round (42)
*BLO sc* around (42) Repeat for 2 rounds total
if sole of shoe is a different color than main part of shoe, change colors for second BLO round.
*sc* around (42)
sc 9, *dec, sc 2* three times, sc 21 (39)
sc 9, *dec, sc* three times, sc 21 (36)
Ballet Flats or Heels(where skin on top of foot is visible): switch to skin / sock color, tie off shoe color, and hide ends inside of foot. Complete this additional round before continuing: *BLO sc* around (36)
sc 6, dec 6, sc 18 (30)
Lace Up Shoes: For the next two rounds, complete the alternate instructions below each round instead of the main instructions
sc 6, dec 3, sc 18 (27)
Lace Up Instructions: sc 6, dec 3, BLO sc 18 (27)
sc 4, dec 3, sc 17 (24)
Lace Up Instructions: BLO sc 4, BLO dec 3, switch to skin/sock color, leaving tail of shoe color on front of work, sc 17
sc 3, dec 3, sc 15 (21)
sc 1, dec 3, sc 14 (18)
*sc* around (18)
dec 3, sc 12 (15)
stuff foot.
*sc 3, dec* 3 times (12)
*sc* around (12) 2 total rounds
Pants Only: *inc* around (24), tie off, complete lace up shoe instructions if needed, stuff ankle, and skip to pants Instructions
*sc 3, inc* 3 times (15)
*sc* around (15) Repeat for 2 rounds total
*sc 2, inc, sc 2* around (18)
*sc* around (18) Repeat for 2 rounds total
*inc, sc 2* 6 times (24)
*sc* around (24) Repeat for 10 rounds total
Shorts Only: complete 8 rounds above, tie off, complete lace up shoe instructions if needed, stuff leg, and skip to pants Instructions
switch to skirt color, *sc 3, inc* around (30)
*sc* around, tie off.
On second leg only: Do not complete final round or tie off, continue to body instructions
Lace Up Shoes: Finishing Steps
Using the shoe color tail left at the front of the work, pull up a loop in the front of the shoe, the stitches will be created in the front loops left during the creation of the shoe. Start by creating the tongue of the shoe in the very front and center.
sc 3, ch 1, turn
inc 3, ch 1, sc once on the side of the tongue, then slip stitch back into the first stitch, at the corner of the tongue, ch 1
sc in all loops around the shoe, ending in the same stitch as the other side of the tongue sc 21, ch 1, turn (21)
*sc* around (21)
For high top shoes repeat round 4 two or three more times.
tie off. hide all ends inside of shoe, use yarn and a sewing needle to add laces on front of shoe.
Pants / Shorts
created by working in rounds following a foundation chain]
Foundation chain: ch 24, slst to first chain, ch 1,
*sc around (24) Repeat for 5 total rounds
Join Pant to Ankle: Sew in tail, carefully pull the pant over the ankle so the top of ankle and pant line up and your working yarn is accessible.
sctog join 24 (pant to ankle) (24)
*sc* around (24)
Pants: repeat last round 12 times
Shorts: Repeat last round 2 times
*sc 3, inc* around (30)
*sc* around (30) Repeat for 2 total rounds tie off.
On second leg only: Do not tie off leg, continue to instructions to complete body.
Body (make 1)
If making a dress or skirt, continue with Skirt instructions first, then return to these instructions to complete. Starting Body: Begin body by continuing work from the second leg created, sc around leg until you reach the place where the legs should join together in the front of the doll, the line the first leg up with the
sctog join(legs)10 move sm to last stitch in this round
continue around first leg, sc 20, sc in the middle of the legs, continue around outside of second leg, sc 20 (41)
continue onto sm as the start of the new round
*sc 3, inc, sc 3* around (48)
*sc* around (48) Repeat for 12 total rounds as below
Pants / Shorts: Complete 6 rounds of pants color, switch to shirt color, complete first round of shirt color BLO, and complete rest of rounds in shirt color. For Belt and Belt Loops: complete 2 rounds in pant color and use Belt Instructions before returning on round 16.
Dress/ Body Suit: Complete all rounds in dress color, carefully pull the skirt over the body to line up top / narrow end of skit with working row. Complete the following additional round before continuing with work: sctog join(skirt to body) 48 (48Next round is crocheted through both parts to join.
*sc 3, dec, sc 3* around (42)
*sc* around (42)
sc 5, dec* around (36)
*sc* around (36)
*sc 2, dec, sc 2* around (30)
*sc* around (30)
*sc 3, dec* around (24)
*sc* around (24)
Join Arms to Body: the following round will join the arms to the body on the sctog join stitches. ensure arms have thumbs facing correctly and a adjust placement so arms are correctly placed with 6 sc between
sctog join (arm to body) 6, sc 6, sctog join( arm to body) 6, sc 6 (24)
*sc, dec, sc* around (18)
switch to skin color, *BLO sc* around (18)
*sc* around
For Turtleneck: pull up loop of clothing color in loops left at neckline, *sc* around (18)
tie off all end, set aside to sew head on at end
Head and Face
The head and face is made last, then attached to the body.
Nose
create 6 sc into a magic circle (6)
*inc, sc* around (9)
*sc* around (9)
sc 3, tie off and set aside to use during head creation.
Head
begin by working in rounds with the hair color, for bald dolls, start with skin color.
create 6 sc into a magic circle (6)
*inc* around (12)
*sc, inc* around (18)
*sc, inc, sc* around (24)
*sc 3, inc* around (30)
switch to skin color
*sc 2, inc, sc 2* around (36)
*sc 5, inc* around (42)
*sc 3, inc, sc 3* around (48)
*sc 7, inc* around (54)
*sc* around (54)
*sc 4, inc, sc 4* around (60)
*sc* around (60) Repeat for 12 total rounds
for longer/ more narrow face, add 2 more rounds, shorter and more round faces are 1 less.
*sc 4, dec, sc 4* around (54)
*sc 7, inc* around (48)
*sc 3, dec, sc 3* around (42)
*sc* around (42)*sc* around (42)
sc 5, dec* around (36)
*sc 2 ,dec, sc 2* around (30)
*sc* around (30)
*sc 3, dec* around (24)
Place Hair: install the hair to the 5 rounds at top of head, and in a strip down toward the base of the head.
sc, *dec, sc* around, (18)
Face Shaping and Eyes: stuff head firmly, use a thread to complete eye indents/ face shaping and place safety eyes and secure. Make any adjustments needed to hair. sew on the nose and ensure the face is stuffed and appropriately shaped before continuing. Face shaping tips
*sc 2, dec, sc 2* around (15)
*sc* around (15) Repeat for 4 total rounds
*sc 2, inc, sc 2* around (18)
*sc* around (18) Repeat for 3 total rounds
*sc, dec* around (12)
stuff neck firmly
*dec* around (6)
tie off, sew closed. set aside until final assembly.
Final Assembly
Firmly attach a string of yarn the same color as the pants through the bottom of the neck, while interesting the neck into the top hole of the body, ensure the body is frimly stuffed around the neck, and sew straight through the body between the legs to anchor the neck and head in place to stop the neck from being floppy. sew the neck created in the body to the neck created on the head (most or all of the neck created on the head should actually be shoved inside of the body.
Doll Design Decision Items
Before starting your doll, it is important to determine what you want the doll to look like, what clothing and hairstyle the doll has are the biggest determinations in making a doll that is recognizable as the person it is honoring. It is recommended that you collect several pictures of the individual you are making, and choose an outfit to recreate or emulate which is recognizable for that individual.
Face Shaping Tips
Face shaping is more of an art than a science, and it has the biggest impact on the face you create. I recommend looking at a picture of the person you are creating while completing face shaping steps. Thread a needle with yarn and create a large, secure knot at the end of the yarn. Sew up through the hole still in the head and then out through the first eye socket placement. Sew back through the head into the second eye socket and pull tightly so that the shape of the face changes. Hold your dolls nose up to the face to find placement before sewing back and forth between the eye sockets a few more times to secure. Hide all ends in the face and place safety eyes before continuing in the pattern.
Installing Hair /Hair Tips
The hair will be added either by pulling hair through the spaces between stitches, or by sewing on strands of hair completed separately (see instructions below based on hair type). Start at the very top of head where your magic circle is, then add hair around that for about 5 rounds on the top of the head.
Next, add a strip of hair from the top circle in a straight line down the back of the head. This strip should be about 5 stitches wide and about 20 rounds long stretching toward the working round.
Once finished, if needed, add hair to the top of the head to minimize any transition between the top circle and back of head strip. Only add enough to minimize the transition. If sewing on a hat, it is only necessary to place hair around the edges and in such a way that enough hair comes out of the hat.
Straight Hair / Kinky Hair
Make small bunches of yarn, tied in a knot at the end, ensuring the portion of yarn is longer than you will want the hair to be on the final doll as you will give the doll a hair cut at the end. I wrap yarn around a book large enough to give me the length I want, then cut all strands at the same place.
Push your hook through the work from the outside to the inside of the head and pull 1 - 3 strands of yarn through the head at a time so the knots are inside the head with the hair pulled through each hole. Pull each bunch through tight. Stuffing will hold knots in place when complete.
Pull more strands of hair through the holes (2 - 3 strands at a time) around the hairline and part (5th round on top, and on the ends of the strip, also along the top of the head
After head and face shaping is complete,
To make kinky hair, unravel the individual strands of yarn.- a fine tooth comb can be helpful with this step, work from the ends of the strand toward the top to fully untwist the strands of hair.
Curly Hair
Create curls individually, then use tails of curls to sew to head. Important: Curls cannot be cut after creation, so curls will need to be made to the desired length, use longer curls on top and shorter curls on the bottom / back of head. To make individual curls chain to desired length, then sc starting in the second chain, all the way to the end based on curl pattern:
Ringlettes: sc 3 times in every chain
Curls: sc 2 times in every chain
Wavy Hair: *sc 3 times in first chain, sc once in next 3 chains* repeat to end
Twists / Dreads / Braids
Create twists individually by using a cord maker to twist yarn to desired length. Similarly, create braids to correct length and sew on. Secure each to the top of the doll’s head by sewing on with yarn ends.
Alternate Instructions
Shoes
Heel Instructions
High Heel
completed in rounds.
6 sc into a magic circle
*inc* around (12)
*BLO sc* around (12)
- 6. *sc* around (12) 3 total rounds
*sc, inc* around (18)
sc 12, do not complete round (12)
tie off, but do not remove sm until attaching to sole of shoe
Short Heel
completed in rounds.
6 sc into a magic circle
*inc* around (12)
*sc, inc* 6 times (18)
*sc* around (18)
sc 12, do not complete round.
for wide high heels complete round 4 two additional times. tie off, but do not remove sm until attaching to sole of shoe
Joining Heel to Shoe Alternate Instructions
When prompted in shoe instructions, complete these rounds below to attach the heel.
sc 9, *inc, sc* three times, sc 9, sctog(heel to shoe) 6 (33)
sc 10, *inc, sc 2* two times, inc, sc 10, inc 6 (42)
stuff heel, in next round, attach the outside of the heel by crocheting through outside of heel to inside and then through the sole of the shoe, starting with the sm on the heel (remove this sm)
BLO sc 30, sctog join(outer heel to shoe) 12 After complete, return to round 7 of the main shoe instructions.
Pointy Boots
Completed in rounds, following a foundation row. Following work, starting in round 1, completed in rounds. Mark first stitch in round to ensure count.
Foundation Row: ch 7, starting in the 2nd ch from the hook: sc 6 across, ch 1, turn.
BLO sc 4 times all in the first st, BLO sc 4, BLO 3 sc inc, in the last stitch, continue around the other side of the foundation row, working into the front loops left behind in the previous step.FLO inc, FLO sc 4, FLO inc in final stitch (19)
inc 4, sc 6, 3sc inc, sc 6, inc 2 (27)
*inc, sc* three times, inc, sc 8, 3sc inc, sc 7 *inc, sc* two times (35)
*sc 2, inc* three times, sc 11, 3sc inc, sc 10, inc, sc 2, inc (42)
Join heel: sc heel to current working piece. Insert hook through heel, inside of heel to outside of heel, then insert hook through current piece like normal. Pull loop through both parts to complete.
sctog join 9, continue around current piece, BLO 15, BLO sc3tog, BLO sc 15 (40)
sc, continue onto heel, sc 9, around heel, continue onto main piece, sc 14, sc3tog, sc 14 (39)
dec, sc 18, dec 2, sc3tog, dec 2, sc 9 (33)
sc 15, *dec, sc* three times, dec, sc 6 (28)
sc 17, sc3tog, sc 8 (26)
sc 16, sc3tog, sc 7 (24)
*sc* around (24)
sc 12, dec 6 (18)
*sc 3, dec* three times (15)
*sc* around (15)
tuck all ends into foot, stuff foot.
leg color: BLO sc 9, BLO dec 3 (12)
*sc* around (12) three total rounds
use working yarn from boot to pull up loop, and begin working in the front loops left when leg color was added in
*sc* around (15) two total rounds
tie off boot color, sew in ends and stuff foot. continue working in ankle color.
*sc 3, inc* 3 times (15)
If Pants: skip to Pants instructions
*sc* around (15)
sc 2, *inc, sc 4* 2 times, inc, sc 2 (18)
*sc* around (18)
*inc, sc 2* 6 times (24)
- 32. *sc* around (24) 10 rounds total
*sc 2, dec* around (18)
tie off. ensure leg is well stuffed and set aside to sew on at end
Face
Extra Small Nose
create 6 sc into a magic circle (6)
*inc, sc* around (9)
sc 3
tie off and set aside to use during head creation.
Wider Nose
create 6 sc into a magic circle (6)
*inc, sc* around (9)
sc 3, *inc* two times, sc 2, *inc* two times (13)
*sc* around (13)
sc 3
tie off and set aside to use during head creation
Skirts, Shirts, and Jackets
Skirt
Add more or fewer rows depending upon the length desired.
Foundation row: ch 48, do not twist the chain during this step: slst to first chain, ch 1, *sc* around (48)
*sc* around (48) 5 total rounds
*sc 7, inc* around (54)
*sc* around (54) 5 total rounds
*sc 4, inc, sc 4* around (60)
*sc* around (60) 5 total rounds
tie off. set aside and continue to body instructions.
Jacket
Completed in rows.
Foundation row: ch 25, sc into 2nd chain from hook, *sc* across , ch 1, turn (24)
sc 3, ch 6, skip 6 stitches, sc 6, ch 6, skip 6 stitches, sc 3, ch 1, turn (24)
sc 3, sc 6 into chain, sc 6, sc 6 into chain, sc 3 (24)
sc 4, *inc, sc 2* five times, inc, sc 4, ch 1, turn (30)
sc 5, *inc, sc 3* five times, inc, sc 4, ch 1, turn (36)
sc 5, *inc, sc 4* five times, inc, sc 5, ch 1, turn (42)
*sc* across, ch 1, turn (42)
sc 6, *sc 5, inc* around, ch 1, turn (48)
- 11. *sc* across, ch 1, turn (48) 2 total rounds
sc 6, *inc, sc 6* around, sc 6, ch 1, turn (54)
- 15. *sc* across, ch 1, turn (54) 3 total
turn, and crochet along side of jacket, toward top.
sc 14 along side, (all in first stitch of top of jacket: sc, ch 1, sc), continue around top of jacket, sc 23, all (all in last stitch: sc, ch 1, sc),continue down other side, sc 14, (all in last stitch: sc, ch 1, sc), slst to start, tie off. pull arms through holes of jacket and sew jacket on to the body around the arm
Accessories
Belt and Belt Loops
Both are crocheted in rows
Belt
ch 3, begin in second loop from the hook, sc 2, ch 1, turn (2)
- 61 sc 2, ch 1, turn (2) 60 total rows
switch to buckle color, crochet along top of belt
sc 3, ch 4, pull chain across belt slst to other side of belt, ch 1, sc 3 back toward end, ch 4, slst to first buckle
tie off and sew in ends.
Belt Loops (make 5)
ch 5, begin in second loop from the hook, sc 4, tie off, ch 1, turn (2)
Instructions for attaching to body
When prompted, sc in the belt loops by sticking hook op through the end of the belt look piece, and then through the pants. The following are alternate instructions for rows 5 - 15 of the body instructions:
continue onto sm as the start of the new round
*sc* around (48) 12 total rounds as below
Complete 2 rounds of pants color
*sctog(loop to body) 1, sc 8* two times, sctog(loop to body) 1, sc 10, *sctog(loop to body) 1, sc 8* two times (48)
Complete 2 more rounds in pants color
Attach top part of belt loops to body: *sctog(loop to body) 1, sc 8* two times, sctog(loop to body) 1, sc 10, *sctog(loop to body) 1, sc 8* two times (48)
switch to shirt color, complete first round of shirt color BLO, and complete rest of rounds in shirt color (5 more rounds)
Pull belt through belt loops and secure belt buckle. Return to complete instructions for body.
Cowboy Hat
Foundation Row: start with a tail long enough to sew in, ch 7, starting in the 2nd ch from the hook: sc 6 across, ch 1, turn, all following instructions in rounds.
BLO sc 3 times all in the first st, BLO sc 4, BLO sc 3 all in the last stitch, continue around the other side of the foundation row, repeat instructions of round a second time, working into the front loops left behind in the previous step (20)
*inc, sc 8, inc* two times (24)
*sc* around (24)
sc 2, *inc, sc 2* two times, inc, sc 3, repeat instructions from start of round (30)
sc 3, *BLO inc, BLO sc 3* two times, BLO inc, sc 3, repeat instructions from start of round (36)
*sc 4, BLO sc 10, sc 4* two times (36)
*sc* around (36) Repeat for 2 total rounds
*inc, sc, inc, sc 13, inc, sc* two times (42)
*sc* around (42) Repeat for 2 total rounds
*inc, sc 2, inc, sc 14, inc, sc 2* two times (48)
*sc* around (48) Repeat for 2 total rounds
sc crochet until the next stitch is the front center of the hat, start next round there (sc 3)
*inc, sc 2, inc, sc 17, inc, sc 2* two times (54)
*sc* around (54) Repeat for 5 total rounds
slst, ch 1, turn, trace hat on middle of plastic sheet, work following rounds in opposite direction
*BLO sc* around (54)
sc 18, *inc,3* four times, inc, sc 18, inc (60)
sc, inc,sc 21,*inc, sc 4* three times, inc, sc 20, inc, sc (66)
sc, inc,sc 20,*inc, sc 6* three times, inc, sc 20, inc, sc (72)
sc, inc,sc 21,*inc, sc 7* three times, inc, sc 22, inc, sc (78)
sc 6, *inc,sc 12* five times, inc, sc 6 (84)
*sc 13, inc* around (90)
sc 7, *inc, sc 14* five times, inc, sc 7 (96)
*sc 15, inc* around (102)
sc 8, *inc, sc 16* five times, inc, sc 8 (108)
*sc 17, inc* around (114)
sc 9, *inc, sc 18* five times, inc, sc 9 (120)
*BLO sc* around (120)
BLO sc 9, *BLO inc, BLO sc 18* five times, BLO inc, BLO sc 9 (114)
*sc 17, dec* around (108)
sc 8, *dec, sc 16* five times, dec, sc 8 (102)
*sc 15, dec* around (96)
sc 7, *dec, sc 14* five times, dec, sc 7 (90)
*sc 13, dec* around (84)
sc 6, *dec, sc 12* five times, dec, sc 6 (78)
sc, dec, sc 21,*decc, sc 7* three times, dec, sc 21, dec, sc (72)
sc, dec,sc 20,*dec, sc 6* three times, dec, sc 20, dec, sc (66)
sc, dec,sc 21,*dec, sc 4* three times, dec, sc 20, dec, sc (60)
sc 18, *dec, 3* four times, dec, sc 18, dec (60)